
Blog
Sabian Symbols: A Complete Guide to Their Meanings, Origins, and Astrology


Sabian Symbols are a fascinating part of astrology that connect the 360 degrees of the zodiac with short, imaginative descriptions of everyday situations, people, objects, and experiences. Each symbol offers a unique image that astrologers can explore for its possible symbolic meaning, making this system different from approaches that focus primarily on planets, zodiac signs, and houses. Whether you are a beginner learning about astrology or an experienced reader looking for another way to interpret a birth chart, Sabian Symbols provide an opportunity to explore astrological symbolism through imagination, reflection, and personal interpretation.
The interest in Sabian Symbols comes from their ability to turn an abstract zodiac degree into a memorable image. Rather than describing a personality through a simple list of characteristics, a symbol might present a scene involving a person, a natural event, or a familiar object. Readers can then consider how that image relates to a particular planet, an important life question, or a moment of personal development. Although Sabian Symbols are part of an esoteric astrological tradition rather than a scientifically validated method of prediction, they remain an engaging resource for people interested in astrology, symbolism, and self-reflection.
What Are Sabian Symbols?
Sabian Symbols are a collection of 360 symbolic descriptions, with one assigned to each degree of the zodiac. Since the zodiac contains twelve signs and each sign occupies 30 degrees, the complete system covers the entire astrological circle. Each description is intended to represent a distinct image or situation, providing an additional layer of interpretation for astrologers who work with precise planetary positions. The symbols are often written in poetic or visual language, which allows readers to explore their meaning through associations rather than relying exclusively on technical astrological terminology.
The defining feature of Sabian Symbols is their emphasis on imagery. A description may involve a person performing an ordinary activity, an unusual natural scene, a social gathering, or an object that carries symbolic significance. These images can be interpreted in different ways depending on the astrological placement and the reader’s approach. For example, a symbol associated with the Sun might be considered in relation to identity and personal direction, while one associated with the Moon might be explored through emotional experiences and familiar patterns. These are interpretive possibilities, not fixed meanings, and the same image may offer different insights in different chart contexts.
The History and Origins of Sabian Symbols
The Sabian Symbols originated in 1925 through the collaboration of American astrologer and . According to accounts published by the Sabian Assembly, the pair worked together in Balboa Park in San Diego, California, to create a set of symbolic images for the zodiac’s 360 degrees. Jones prepared cards representing the degrees, while Wheeler described images that she associated with the cards. The descriptions were recorded and subsequently developed into a system of astrological interpretation.
Jones later organized and expanded the material, producing interpretations that gave the original images a broader astrological context. His book, The Sabian Symbols in Astrology, was published in 1953 and became an important reference for the system. The work also helped establish the Sabian Symbols as a recognizable part of modern esoteric astrology. Over time, other astrologers developed their own approaches to interpreting the images, contributing to the variety of explanations and practical methods available to readers today.
It is important to distinguish the historical account of how the symbols were created from the spiritual explanations sometimes associated with them. The account of Wheeler receiving images through clairvoyance is part of the tradition’s origin story; it is not evidence that the symbols were transmitted through supernatural means. Readers can study the system as a historical and symbolic practice without accepting every metaphysical explanation connected to it.
How the 360 Sabian Symbols Work
The foundation of the Sabian system is the 360-degree zodiac. Each of the twelve zodiac signs contains 30 degrees, giving the full zodiac a total of 360 symbolic positions. A Sabian Symbol is associated with each position, creating a complete sequence of images that follows the zodiac from Aries through Pisces. When an astrologer identifies a planet’s degree in a birth chart, that degree can be connected with its corresponding Sabian Symbol for additional interpretation.
The degree numbering system is particularly important because astrological chart software may display positions using degrees, minutes, and seconds. A planet located at 12 degrees and 20 minutes of a sign is generally associated with the symbol for the 13th degree in the traditional Sabian convention. This is because the first degree begins at 0°00′ and extends to 0°59′59″, while the second degree begins at 1°00′. As a result, a planet at 12°20′ falls within the thirteenth one-degree segment of its sign. Understanding this convention helps readers avoid selecting the wrong symbol when looking up a planetary placement.
The Sabian Symbols are not the same as the twelve zodiac signs themselves. A zodiac sign describes a broad area of the astrological chart, while a Sabian Symbol provides a more specific image connected to one degree within that sign. This distinction is useful because two people with the same Sun sign may have their Sun placed at different degrees and therefore be associated with different Sabian Symbols. The symbols can also be applied to the Moon, planets, Ascendant, Midheaven, and other chart points, depending on the astrologer’s preferred method.
How to Find Your Sabian Symbol Using Your Birth Chart
Finding your Sabian Symbol begins with obtaining an accurate birth chart. A natal chart typically requires your date of birth, birth time, and birthplace. The birth time is particularly important when you want to examine the Ascendant or Midheaven, because these chart points depend on the time and location of birth. If your birth time is unknown, you can still look up the Sabian Symbol for a planetary placement when its zodiac sign and degree are reliably established, but some chart points may remain uncertain.
Once you have your chart, locate the planet or chart point you want to explore. The Sun is a common starting point because it is traditionally associated with identity, vitality, and personal direction. The Moon can be examined for themes related to emotions and instinctive responses, while Mercury may be considered in connection with communication and thought. After identifying the sign and degree, use a reliable Sabian Symbol reference to find the corresponding description. Because the traditional system uses the next whole degree, remember to add one to the displayed degree number when the chart gives a position between 0°00′ and 29°59′.
For example, if your chart shows the Sun at 12°20′ Leo, you would look for the Sabian Symbol associated with the thirteenth degree of Leo. This example illustrates the calculation only; it does not establish a personal interpretation or predict anything about the person. After locating the correct description, read it carefully and consider its imagery in relation to the planet’s astrological role. It can be helpful to write down your first impressions before reading several different interpretations, allowing your own associations to become part of the reflective process.
Understanding Sabian Symbols Meaning
The meaning of a Sabian Symbol is not always obvious from its literal description. Some symbols portray familiar situations, while others use unusual or surreal imagery that invites deeper consideration. A scene involving a journey, for instance, might prompt reflection on movement, discovery, change, or the relationship between an individual and the wider world. A symbol involving a gathering of people might raise questions about community, shared responsibilities, social expectations, or cooperation. These associations are possible ways to explore the image, rather than universal definitions that must apply to everyone.
A useful approach is to examine the symbol at several levels. First, consider the literal image: what is happening, who is involved, and what stands out? Next, identify the emotions or ideas the scene brings to mind. Finally, relate those ideas to the astrological placement being interpreted. A symbol connected with Mercury might be explored through the way its imagery relates to communication, learning, or decision-making, while the same symbol connected with Saturn might invite reflection on responsibility, limits, patience, or structure. This contextual approach helps prevent a symbol from being interpreted in isolation.
The Sabian Symbols can also be understood through contrast and development. Some images may suggest beginnings, while others evoke completion, uncertainty, cooperation, or transformation. Rather than assigning a rigid positive or negative meaning to every symbol, readers can ask what kind of situation the image portrays and what questions it raises. A symbol that initially appears challenging may encourage useful reflection about an overlooked problem, while an apparently pleasant image may invite consideration of whether an opportunity requires effort or maturity. The value of the interpretation lies in the quality of the reflection, not in treating the image as a guaranteed prediction.
Sabian Symbols and the Twelve Zodiac Signs
The twelve zodiac signs provide the framework for understanding where each Sabian Symbol belongs. Every sign contains 30 symbols, and the imagery of each degree can be explored alongside the traditional qualities associated with that sign. This creates a relationship between the broad themes of the zodiac and the more specific scenes represented by the symbols. However, a symbol should not be interpreted simply by assuming that every image associated with a particular sign must express the same personality traits.
The 12 zodiac signs and their symbolic themes
Traditional astrological associations that can provide context when exploring Sabian Symbols.
Aries
Beginnings, initiative, courage
Taurus
Stability, resources, values
Gemini
Communication, learning, curiosity
Cancer
Home, belonging, emotional security
Leo
Creativity, expression, recognition
Virgo
Practicality, service, refinement
Libra
Relationships, balance, cooperation
Scorpio
Transformation, depth, renewal
Sagittarius
Exploration, beliefs, discovery
Capricorn
Responsibility, ambition, structure
Aquarius
Innovation, community, independence
Pisces
Imagination, compassion, spirituality
For example, a Sabian Symbol located in Aries might be considered in relation to themes of initiative and beginning, while one in Libra might be explored through relationships and cooperation. These associations do not determine the meaning of the individual symbol, but they can provide a starting point for interpretation. The astrologer can then examine the image itself, the planet’s role, and the surrounding chart placements to develop a more complete understanding.
How to Read Sabian Symbols in Astrology
Reading Sabian Symbols effectively requires patience, curiosity, and an understanding of the wider birth chart. A common mistake is to interpret a symbol as though it were a complete description of a person’s personality or future. In practice, the symbol is better treated as one interpretive detail among many. A natal chart includes planets, signs, houses, aspects, and other relationships, and each of these contributes to the astrologer’s overall interpretation. Sabian Symbols can add an imaginative perspective to this process without replacing the rest of the chart.
A practical reading can begin with the exact degree of the planet or chart point, followed by the corresponding symbol and its literal imagery. The reader can then consider how the symbol relates to the planet’s traditional meaning and the sign in which it appears. If the symbol is associated with the Ascendant, for example, an astrologer might explore how its imagery relates to the way a person approaches new experiences or presents themselves to the world. If it is associated with the Moon, the same process might focus on emotional patterns, comfort, and personal responses. Such interpretations are subjective and should remain open to revision as the reader considers additional context.
It can also be helpful to keep a journal of Sabian Symbol interpretations. Record the symbol, the associated planetary placement, your first impressions, and any questions the image raises. Revisit those notes after some time and consider whether your understanding has changed. This method encourages thoughtful engagement with the symbolism rather than searching for a single definitive answer. It also helps readers distinguish their own observations from interpretations borrowed from books, websites, or other astrologers.
Sabian Symbols for Beginners
For beginners, the best way to explore Sabian Symbols is to start with one or two important placements instead of attempting to interpret all 360 symbols at once. The Sun, Moon, and Ascendant are popular starting points because they are commonly used in natal astrology and provide different perspectives on identity, emotional experience, and personal approach. Choose one placement, confirm its degree, and read the corresponding symbol without rushing to decide what it means.
Beginners should also understand that the symbols are not a replacement for learning basic astrology. Knowing the difference between a planet, sign, and house makes it easier to interpret a symbol within a meaningful context. A planet represents a particular function in the chart, a sign describes the style through which that function is expressed, and a house relates it to an area of life. Sabian Symbols add another layer of imagery to these relationships. Learning these foundations first can make the system more understandable and reduce the temptation to interpret every symbol as a standalone message.
Another helpful practice is to compare different interpretations of the same symbol while remaining aware that authors may approach the imagery differently. Some astrologers emphasize the literal scene, while others focus on psychological, spiritual, or developmental associations. Comparing these perspectives can reveal how flexible symbolic interpretation can be. However, more interpretations do not necessarily produce a more accurate result. It is often more useful to identify a few thoughtful possibilities and consider how they fit the overall astrological context.
Sabian Symbols and Personal Reflection
One reason Sabian Symbols continue to attract interest is their usefulness as prompts for personal reflection. A vivid image can encourage a person to think about an experience from a new perspective, identify an assumption, or explore a question that might otherwise remain unnoticed. This does not require the reader to believe that the symbol has supernatural significance. The process can be approached as a creative exercise in which language, imagery, and personal associations work together to stimulate thought.
For example, a reader might encounter a symbol that portrays an individual facing a difficult choice. Rather than treating the image as a prediction of an unavoidable event, the reader could use it to reflect on a current decision, the information available, and the possible consequences of different actions. Another reader might encounter an image involving cooperation and consider how communication or shared responsibility affects a relationship. In both cases, the symbol becomes a starting point for questions rather than an authority that dictates what someone should do.
It is important to maintain a balanced perspective when using Sabian Symbols for personal guidance. They should not be treated as a substitute for practical reasoning, professional advice, or evidence-based decision-making. A symbol can inspire reflection, but it cannot establish what another person thinks, guarantee a future outcome, or determine whether a major decision is correct. Used thoughtfully, Sabian Symbols can remain an enjoyable way to explore astrology while preserving personal judgment and responsibility.
Common Mistakes When Interpreting Sabian Symbols
One of the most frequent mistakes is selecting the wrong degree. Since the traditional Sabian convention assigns the first symbol to the first degree of a sign, a planet at 0°20′ is associated with the first-degree symbol, not the symbol for the zero-th degree. A planet at 12°20′ is associated with the thirteenth-degree symbol. Checking the degree convention carefully is essential because choosing a neighboring symbol can lead to an entirely different interpretation.
Another common mistake is assuming that every symbol has one universally accepted meaning. Although reference books and experienced astrologers provide interpretations, the images are often open to multiple readings. A description can be understood differently depending on its context, the astrologer’s approach, and the questions being explored. Readers should avoid forcing an interpretation to fit a personal situation simply because they want the symbol to confirm a particular belief or expectation.
Finally, Sabian Symbols should not be confused with scientific evidence. Astrology has not been established as a scientifically reliable method for predicting personality or future events. The symbols are best understood as part of an interpretive and symbolic tradition. Keeping this distinction clear allows readers to explore their imagery with curiosity while avoiding exaggerated claims about what the symbols can prove or predict.
Conclusion
Sabian Symbols offer an imaginative way to explore the 360 degrees of the zodiac through symbolic images and reflective interpretation. Originating from the 1925 collaboration between Marc Edmund Jones and Elsie Wheeler, the system became an established part of modern esoteric astrology through Jones’s subsequent work and the contributions of later astrologers. Its distinctive approach connects precise zodiac degrees with vivid descriptions that can be explored alongside planets, signs, and other elements of a birth chart.
For anyone interested in learning about Sabian Symbols, the most useful starting point is to understand the degree system, locate an accurate chart placement, and examine the corresponding image with an open and thoughtful mind. Whether used for astrology study, creative exploration, or personal reflection, the symbols can provide a fresh perspective on familiar questions. Their greatest value lies in encouraging curiosity and interpretation rather than promising certainty about personality, relationships, or the future.
Frequently Asked Questions (FAQ)
1. What are Sabian Symbols in astrology?
Sabian Symbols are a set of 360 symbolic descriptions, with one assigned to each degree of the zodiac. Astrologers use them as an additional interpretive tool when examining planetary positions and other points in a birth chart. Each symbol presents an image or situation that can be explored for its possible symbolic meaning.
2. Who created the Sabian Symbols?
The Sabian Symbols originated in 1925 through the collaboration of astrologer Marc Edmund Jones and clairvoyant Elsie Wheeler. Wheeler described images associated with zodiac-degree cards prepared by Jones, and Jones later developed the material into a system of astrological interpretation.
3. How many Sabian Symbols are there?
There are 360 Sabian Symbols in the complete system. Each of the twelve zodiac signs contains 30 degrees, giving the zodiac a total of 360 degrees.
4. How do I find my personal Sabian Symbol?
First, obtain your natal birth chart and identify the zodiac sign and exact degree of the planet or chart point you want to explore. Then use a reliable Sabian Symbol reference to locate the corresponding description. Remember that the traditional numbering convention uses the next whole degree, so a placement at 12°20′ corresponds to the thirteenth-degree symbol.
5. Are Sabian Symbols connected to zodiac signs?
Yes. Each Sabian Symbol belongs to one of the twelve zodiac signs and represents a particular degree within that sign. The sign provides a broader astrological context, while the individual symbol adds a more specific image for interpretation.
6. Can Sabian Symbols predict the future?
Sabian Symbols are used in some astrological traditions for reflection and interpretation, but they are not a scientifically established method of predicting future events. They should not be treated as guarantees about what will happen or as a replacement for practical decision-making.
7. Can beginners use Sabian Symbols?
Yes. Beginners can start by exploring the symbols associated with their Sun, Moon, or Ascendant. Learning the basic zodiac-degree system and understanding how planets and signs work together will make the symbols easier to interpret.
8. What is the difference between Sabian Symbols and zodiac symbols?
Zodiac symbols represent the twelve astrological signs, such as Aries, Taurus, and Gemini. Sabian Symbols are a separate set of 360 images, with one corresponding to each zodiac degree. The two systems can be used together, but they serve different interpretive purposes.
9. Do Sabian Symbols have official meanings?
The system has established descriptions and published interpretations, including those associated with Marc Edmund Jones’s work. However, the interpretation of an image can vary between astrologers and readers. It is useful to distinguish the original description from later explanations and personal associations.
10. What is the best way to learn Sabian Symbols?
Start with the basics of natal astrology, learn how to identify the correct zodiac degree, and explore one symbol at a time. Reading reliable reference material, comparing interpretations, and keeping a journal of your observations can help develop a more thoughtful understanding of the system.



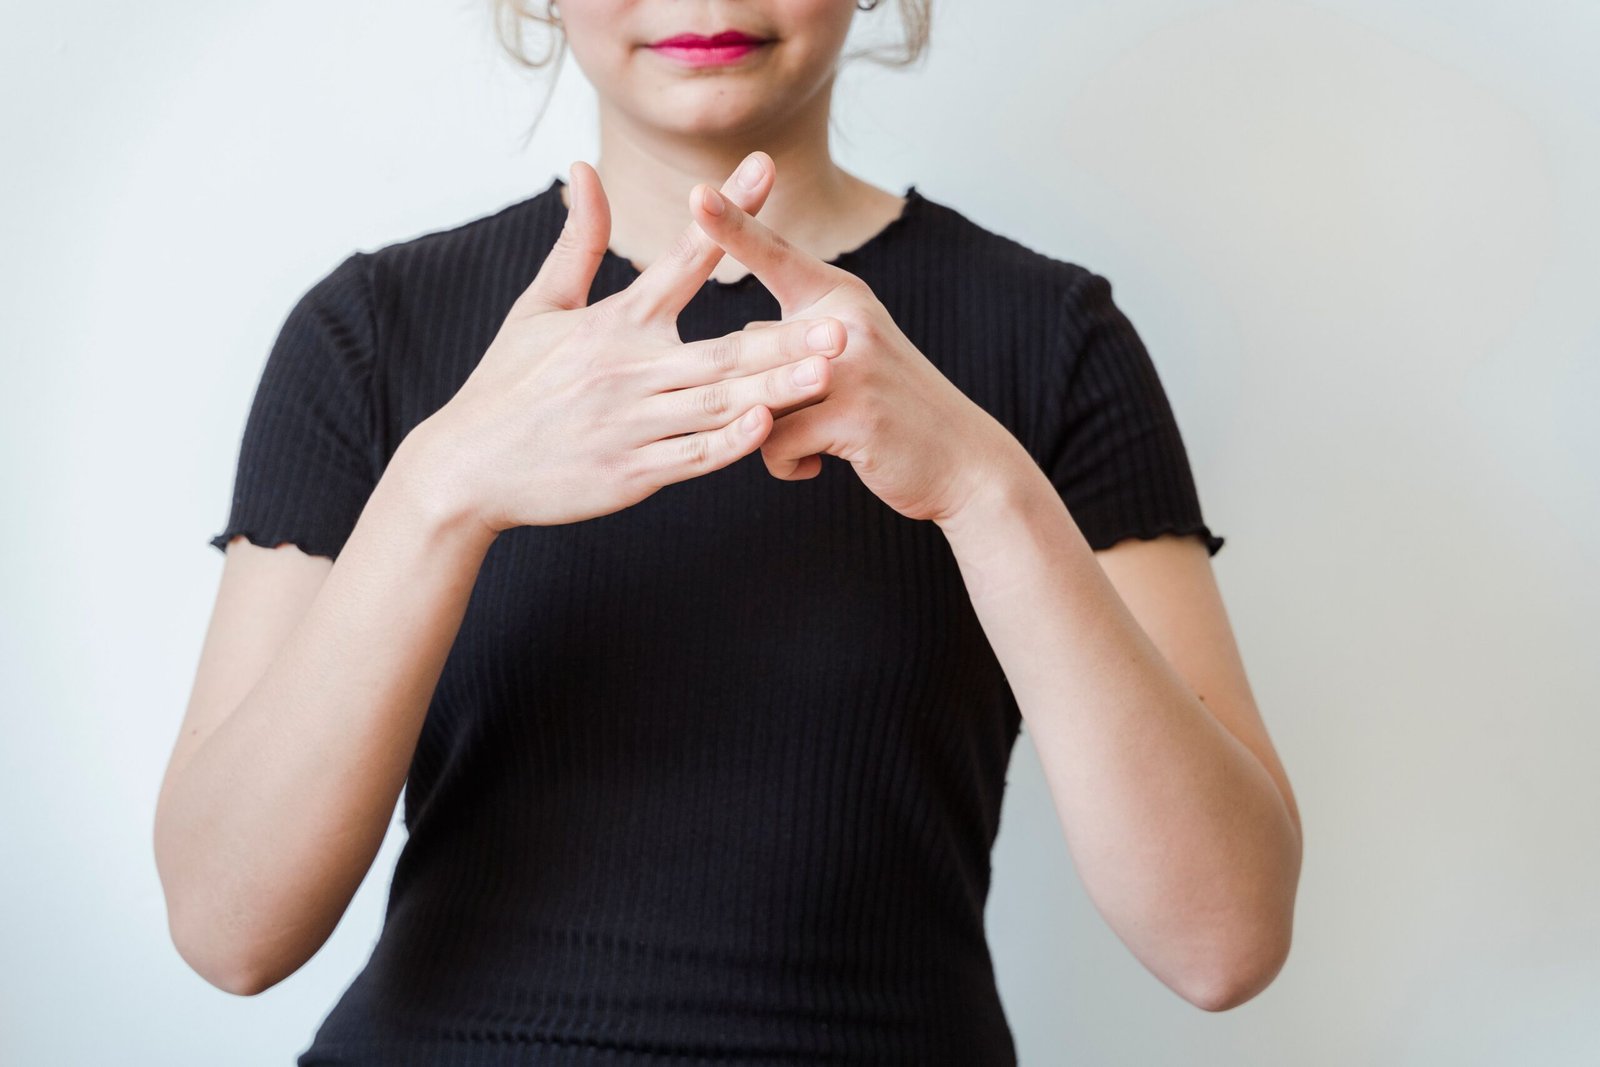
Learning individual vocabulary signs is one of the easiest ways for beginners to start building confidence in American Sign Language (ASL), and apple in ASL is a useful example because it introduces learners to the relationship between handshape, movement, and meaning. Whether you are learning ASL for personal interest, communicating with Deaf or hard-of-hearing people, studying sign language vocabulary, or teaching basic signs to children, understanding how common words are represented visually can make the learning process more engaging. The sign for apple is frequently included in beginner ASL vocabulary because it is a familiar everyday word and can be practiced alongside other food-related signs. However, simply memorizing a hand movement is not enough to become comfortable with ASL. Learners should also pay attention to hand orientation, location, movement, facial expression, and the broader context in which a sign is used.
When searching for apple in ASL, many beginners are looking for a quick answer, but a good explanation should provide more than a one-line definition. It should explain the general movement involved, clarify what learners should pay attention to, and place the sign within the larger structure of American Sign Language. ASL is a complete natural language rather than a system of English words represented with the hands, so learning vocabulary works best when individual signs are eventually combined with ASL grammar and conversational practice. This guide explores the apple ASL sign, explains how beginners can practice it, discusses common mistakes, and answers frequently asked questions about signing “apple” in American Sign Language.
What Is Apple in ASL?
The apple in ASL sign is a commonly taught vocabulary sign associated with the concept of an apple or the fruit itself. In many ASL learning resources, the sign is demonstrated using a particular handshape and a twisting or rotating movement near the cheek area. Beginners may initially find this movement unusual because it does not visually resemble an apple in an obvious way. That is completely normal. Signs in ASL do not always look like the objects or actions they represent, and their meanings are learned through repeated exposure and use. Rather than trying to create a literal picture of an apple with your hands, learners should focus on remembering the established ASL handshape, location, and movement.
An important point for anyone studying apple in American Sign Language is that the sign should be learned as part of ASL vocabulary rather than as an isolated gesture. When you practice the sign, concentrate on reproducing the movement consistently and comfortably instead of exaggerating it. Watching a qualified ASL instructor or Deaf signer can be especially useful because small differences in hand position or movement can be easier to understand visually than through written instructions. Once you become familiar with the sign for apple, you can begin combining it with other basic food and everyday vocabulary to create more meaningful ASL practice.
How to Sign Apple in ASL
To learn the apple ASL sign, begin by becoming familiar with the handshape used in the standard sign. The commonly taught version involves forming the appropriate handshape and positioning it beside the cheek, followed by a twisting motion. The movement is relatively compact, so beginners should avoid making the gesture excessively large or turning it into a broad circular motion. The goal is to reproduce the established sign naturally and consistently. Because ASL is visual and three-dimensional, written descriptions can only provide a general guide; watching an accurate demonstration is the best way to understand exactly how the handshape and movement work together.
When practicing how to sign apple, start slowly and separate the individual elements of the sign. First focus on the handshape, then practice placing the hand in the correct location, and finally add the movement. After you can perform each component comfortably, combine them into one smooth sign. Repeating the sign slowly several times can help build muscle memory, after which you can gradually increase your natural signing speed. Avoid worrying about speed at the beginning. Accuracy, comfortable movement, and consistency are more valuable for a new learner than trying to imitate the speed of an experienced signer immediately.
Understanding the Apple ASL Handshape
Handshape is one of the most important components of ASL because changing the configuration of the hand can change the meaning of a sign. When learning apple in ASL, beginners should therefore pay close attention to the fingers and thumb rather than concentrating only on the movement. It is common for new signers to remember the general idea of a gesture while allowing the handshape to become inconsistent. This can make the sign less recognizable or potentially turn it into a different sign. Practicing in front of a mirror can help because you can observe whether your fingers remain in the intended position throughout the movement.
Another useful technique is to practice the apple sign several times without immediately trying to connect it to a sentence. This gives you an opportunity to develop control over your handshape and movement. Once the basic sign feels comfortable, practice it in different contexts, such as naming foods, discussing a meal, or talking about fruit. Contextual practice helps move vocabulary from simple memorization toward usable communication. Over time, you will begin recognizing the sign more quickly when watching other people sign as well.
Why Learning Apple in ASL Is Useful for Beginners
Learning apple in ASL can be useful because familiar everyday vocabulary gives beginners an accessible way to develop their signing skills. Food vocabulary is especially practical because it can be used in many ordinary conversations involving meals, shopping, restaurants, cooking, nutrition, and personal preferences. A beginner who learns apple can gradually add related vocabulary such as fruit, banana, orange, bread, milk, water, and other commonly used words. Instead of memorizing disconnected signs, learners can build small vocabulary groups that make practice more meaningful and easier to remember.
The apple ASL sign is also a good reminder that learning ASL involves more than translating individual English words. A person who knows dozens of isolated signs may still struggle to hold a natural conversation if they have not learned ASL grammar, facial expressions, sentence structure, and conversational conventions. For that reason, vocabulary practice should be combined with exposure to authentic ASL whenever possible. Learning from Deaf educators, qualified ASL instructors, and reliable educational resources can help beginners develop a more accurate understanding of the language and its cultural context.
Common Mistakes When Signing Apple
One common mistake when learning apple in ASL is concentrating so much on remembering the meaning that the actual handshape becomes secondary. Beginners sometimes make a gesture that feels approximately correct but does not reproduce the standard form accurately. Another frequent problem is exaggerating the movement. Since beginners often want to make sure the sign is visible, they may use a movement that is much larger than necessary. Practicing slowly in front of a mirror can help correct both issues because it allows learners to see exactly what their hands are doing.
Another mistake is relying entirely on written descriptions of how to sign apple. Written instructions can be useful for reinforcement, but ASL is fundamentally visual, and the precise details of a sign are often much easier to learn by watching it performed. Learners should also avoid assuming that every person signs identically. Natural languages have regional variation, individual signing styles, and contextual differences. If you encounter a variation, it is useful to check a reputable ASL resource or ask a qualified signer rather than automatically assuming that one version is the only possible form.
How to Practice the Apple Sign
A simple practice routine can make apple in ASL much easier to remember. Start by practicing the handshape several times without the movement, making sure your fingers are positioned consistently. Next, add the movement slowly and repeat the complete sign several times. Then look away from your hands and try to produce the sign from memory. If possible, record yourself practicing so you can compare your movement with a trusted instructional demonstration. This type of repetition helps develop both visual recognition and motor memory, two skills that are important for becoming comfortable with ASL.
You can also place apple in ASL into simple vocabulary exercises. For example, practice identifying the sign when you see it performed, then practice producing it when someone says the English word “apple.” After that, expand your practice by learning several related food signs and reviewing them together. The goal is not simply to repeat one movement hundreds of times but to encounter the sign in different situations. Regular short practice sessions are often more manageable and productive than attempting to memorize a large amount of vocabulary in a single sitting.
Apple in ASL and ASL Vocabulary Building
Once you know the sign for apple in ASL, you can use it as a starting point for expanding your vocabulary. Beginners can create themed groups around fruit, food, drinks, family, school, work, hobbies, and everyday activities. Grouping vocabulary by topic makes it easier to remember because the signs become connected to a particular subject rather than existing as unrelated pieces of information. For example, learning apple alongside other fruit vocabulary creates an opportunity to practice recognizing similarities and differences between multiple signs.
Building vocabulary in this way can also make learning American Sign Language more enjoyable. Instead of treating ASL like a list of words to memorize, you can gradually create situations in which the vocabulary becomes useful. You might practice discussing what foods you like, what you ate during the day, or what you want to buy at a grocery store. As your vocabulary grows, you can move from individual signs toward complete phrases and conversations. This progression is much more useful than focusing exclusively on memorizing isolated signs.
Is Apple in ASL the Same as the English Word “Apple”?
The concept represented by apple in ASL corresponds to the English word “apple,” but ASL and English are different languages. This distinction is important because beginners sometimes assume that ASL is simply English translated word by word into hand movements. In reality, ASL has its own grammar, syntax, expressions, and linguistic structure. A person can know the ASL sign for apple without necessarily knowing how to construct a grammatically natural ASL sentence involving that concept.
Understanding this difference will make your study of the apple ASL sign much more productive. Vocabulary is an important foundation, but language proficiency develops through continued exposure, interaction, and understanding of grammar and culture. If your goal is conversational fluency, consider using individual signs as building blocks while gradually learning complete ASL phrases and sentences. This approach allows you to move beyond memorization and toward actual communication.
Tips for Parents and Teachers Teaching Apple in ASL
The apple in ASL sign can be a fun vocabulary item for parents, teachers, and caregivers introducing children to basic signing. Because apples are familiar objects, the concept can be connected to a real fruit, a picture, a classroom activity, or a story. When introducing the sign, demonstrate it clearly and allow the child time to observe and imitate it without pressure. Repetition can be incorporated naturally into everyday activities, such as snack time or discussions about different kinds of fruit. This makes signing part of a meaningful interaction rather than simply a memorization exercise.
Adults teaching how to sign apple should also remember that children may not reproduce a sign perfectly at first. Fine motor skills develop gradually, so the emphasis should be on communication and repeated exposure rather than demanding immediate perfection. Demonstrating the sign consistently and using reliable ASL resources can help children build a stronger foundation. For more comprehensive ASL education, learning from Deaf educators and qualified instructors is particularly valuable because language learning also involves cultural and community understanding.
Apple in ASL for Beginners: What to Remember
If you are just beginning your ASL journey, remember that apple in ASL is only one small part of a much larger language. Focus first on learning the standard handshape, location, and movement associated with the sign, and practice producing it naturally rather than exaggerating the motion. Use visual demonstrations whenever possible, because seeing the complete sign gives you information that a written explanation cannot fully capture. Practice regularly, review the vocabulary you have already learned, and gradually connect individual signs to meaningful situations.
The most important part of learning the apple sign is consistency. You do not need to master hundreds of signs immediately. Learning a small group of useful signs and practicing them regularly can provide a stronger foundation than trying to memorize an enormous vocabulary list without context. As you gain confidence, expand into phrases, questions, descriptions, and conversations. This gradual approach can make ASL learning more enjoyable while helping you develop practical communication skills.
Frequently Asked Questions About Apple in ASL
What is apple in ASL?
Apple in ASL is represented by a commonly taught sign involving a specific handshape and a twisting movement near the cheek. Because ASL is visual, learners should watch an accurate demonstration to understand the precise hand configuration, orientation, location, and movement rather than relying only on a written description.
How do you sign apple in American Sign Language?
To sign apple in American Sign Language, learners generally use the established apple handshape and perform the associated twisting movement near the cheek. Beginners should practice the components slowly and then combine them into one smooth movement while checking their form against a reliable ASL demonstration.
Is the apple ASL sign difficult to learn?
The apple ASL sign is generally approachable for beginners because it uses a relatively compact movement. The main challenge is remembering the correct handshape and performing the movement consistently. Repetition, mirror practice, and visual instruction can make it easier to remember.
Can children learn the sign for apple in ASL?
Yes. Children can learn individual ASL vocabulary signs such as apple through repeated exposure and meaningful activities. Using real objects, pictures, books, or snack-time routines can make the learning process more engaging and memorable.
Is ASL the same as English?
No. American Sign Language is a distinct natural language with its own grammar and linguistic structure. Learning the apple in ASL sign is useful vocabulary practice, but knowing individual signs does not mean that someone has learned ASL grammar or can automatically communicate fluently.
Why should I learn apple in ASL?
Learning apple in ASL provides useful everyday vocabulary and gives beginners an opportunity to practice important elements of signing, including handshape, movement, and location. It can also serve as a starting point for learning other food and fruit vocabulary.
Conclusion
Learning apple in ASL is a simple but useful step for anyone beginning American Sign Language. The sign provides an opportunity to practice how handshape, location, and movement combine to communicate meaning, while also introducing learners to the idea that ASL is a complete visual language rather than a word-for-word version of spoken English. Beginners can make steady progress by practicing the sign carefully, watching reliable demonstrations, and gradually using the vocabulary in meaningful contexts instead of simply memorizing isolated gestures.
Whether you are learning ASL for yourself, teaching basic vocabulary to a child, or expanding your knowledge of sign language, the apple ASL sign can be a practical addition to your vocabulary. Start slowly, focus on accuracy, practice consistently, and then build outward into related food vocabulary and complete ASL expressions. Most importantly, treat each individual sign as part of a larger language-learning journey. With regular practice and exposure to authentic ASL, simple vocabulary such as apple in ASL can become the foundation for broader communication skills.

A wood duck call can be an important piece of equipment for hunters who want to improve their ability to communicate with wood ducks in the field. Unlike simply making noise and hoping a bird responds, effective calling involves understanding the character of the species, recognizing when calling is appropriate, and learning how small changes in tone, rhythm, volume, and timing can affect the sound produced by a call. For beginners, the wide range of calls available today can make the buying process confusing because calls differ in materials, construction, design, tone, volume, and ease of operation. Learning the basics before purchasing a call can therefore save money and help a new caller develop better habits from the beginning. Whether you are completely new to wood duck hunting or already have experience and want to improve your calling technique, understanding how a wood duck call works is a useful starting point.
What Is a Wood Duck Call?
A wood duck call is a hunting call designed to imitate or approximate vocalizations associated with wood ducks. Its purpose is to produce sounds that can help attract the attention of birds or encourage them to investigate an area, although calling should always be considered only one part of a broader hunting strategy. Wood ducks are distinctive birds with recognizable vocalizations, and their behavior can vary depending on their surroundings, weather, season, location, and the presence of other birds. Because of this, successful calling is not simply about purchasing the loudest or most expensive call. A good caller learns how the particular call responds to air pressure and mouth control and then adjusts the sound to match the situation. This is one reason experienced hunters often spend considerable time practicing before taking a new call into the field.
How Does a Wood Duck Call Work?
Most duck calls work by using airflow to create vibration, which produces the characteristic sound of the call. The exact design varies from one model to another, but the caller generally controls the sound through a combination of breath pressure, mouth position, tongue placement, and changes in airflow. A caller who blows too hard may produce an unnatural or overly aggressive sound, while insufficient airflow can result in a weak or inconsistent tone. Learning to control air pressure is therefore one of the most important parts of mastering a wood duck call. Instead of thinking about calling as simply blowing into a device, beginners should approach it as a skill involving controlled airflow and repetition. Regular practice allows the caller to become familiar with how much pressure is needed to produce different tones and how the call responds to subtle changes in technique.
Choosing the Best Wood Duck Call
Choosing the best wood duck call depends largely on the hunter’s experience, preferences, budget, and intended conditions. Beginners may benefit from a call that is relatively easy to operate and forgiving when the caller’s technique is not yet consistent. More experienced callers may prefer a specialized design that provides greater control over pitch, tone, and volume. Materials can also influence the characteristics of a call. Calls made from different types of wood, acrylic, or other materials can have different acoustic properties and physical characteristics. The construction of the call, the quality of its components, and the reputation of the manufacturer may also matter. Rather than choosing a call solely because it is marketed as the loudest or most advanced, consider whether its sound is controllable, whether it feels comfortable, and whether you can consistently reproduce the sounds it is designed to make.
Wood Duck Call Sounds and What They Mean
Understanding wood duck call sounds is just as important as learning how to operate the call itself. Different vocalizations can serve different purposes, and birds may respond differently depending on the circumstances. A caller should therefore avoid using one sound continuously without considering what is happening around them. Listening carefully to real wood ducks can be extremely valuable because it gives you a reference for natural rhythm, pitch, and volume. Recordings can also help beginners become familiar with the general character of wood duck vocalizations, but listening in the field provides another level of understanding because environmental conditions can change how sounds carry. The goal should not necessarily be to make the loudest possible noise. In many situations, controlled and appropriately timed calling is more useful than constant calling.
How to Use a Wood Duck Call
Learning how to use a wood duck call begins with getting comfortable with the instrument before attempting complicated calling sequences. Start by practicing basic airflow and learning how the call reacts to different amounts of pressure. Work on producing a consistent tone rather than immediately attempting advanced sounds. Once you can reliably produce a clean sound, you can begin practicing changes in rhythm, volume, and pitch. It is also useful to practice without constantly blowing at maximum volume because real-world hunting conditions can vary considerably. A call that sounds good in a controlled practice environment may behave differently outdoors, where wind, vegetation, water, and distance affect how sound travels. Developing control rather than relying on force is one of the biggest differences between simply operating a call and actually becoming proficient with it.
Wood Duck Calling Techniques for Beginners
For beginners, wood duck calling techniques should focus on consistency and restraint. One common mistake is assuming that more calling automatically produces better results. In reality, birds may respond differently depending on their behavior and the circumstances around them. A hunter should pay attention to what the birds are doing rather than following a rigid calling routine. Practice different levels of volume and learn to recognize the difference between a clean, controlled sound and a strained sound caused by excessive air pressure. Beginners should also spend time listening because calling ability develops faster when you understand what you are attempting to reproduce. If possible, practice with an experienced caller who can provide immediate feedback. Even a small adjustment to breath control or mouth position can make a noticeable difference in the quality and consistency of a wood duck call.
Why Practice Matters
Practice is one of the most overlooked parts of learning any hunting call. A new caller may purchase an excellent product but struggle to produce consistent sounds because the equipment cannot compensate for undeveloped technique. Short, regular practice sessions are often more productive than occasional long sessions. Begin with simple sounds and concentrate on controlling airflow. As your confidence increases, gradually introduce changes in pitch, volume, and rhythm. Listening to recordings of wood ducks can provide an auditory reference, while practicing outdoors can help you understand how your sound carries in different environments. Over time, your objective should be to operate the call naturally without having to think about every movement. This allows you to concentrate more on observing birds and making decisions rather than focusing entirely on the mechanics of the call.
Common Mistakes When Using a Wood Duck Call
One of the most common mistakes is blowing too hard. New callers sometimes believe that greater air pressure automatically creates a better or more effective sound, but excessive force can make a call sound harsh and unnatural. Another mistake is calling constantly without paying attention to the birds. Calling should be purposeful rather than automatic, and hunters should observe whether birds are reacting before deciding what to do next. Poor maintenance can also affect performance. Moisture, debris, and general wear can change the way a call operates, so keeping equipment clean and properly stored is important. Finally, beginners sometimes switch between calls too frequently instead of learning one call well. Becoming highly familiar with a single reliable call can often be more beneficial than owning several calls that you have not learned to control.
Maintaining Your Wood Duck Call
Proper maintenance can help keep a wood duck call performing consistently for a longer period. After use, inspect the call for moisture and debris, particularly if it has been used in wet conditions. Follow the manufacturer’s cleaning and storage instructions because different call designs and materials may require different care. Wooden calls can require particular attention to moisture and storage conditions, while other materials may have their own maintenance considerations. Avoid using cleaning methods or chemicals that the manufacturer does not recommend because they could damage components or alter the call’s performance. Keeping the call in a suitable protective case when it is not being used can also reduce the chance of accidental damage. A small amount of routine care can make a significant difference in reliability, especially during repeated use throughout a hunting season.
Wood Duck Call Buying Tips
When shopping for a wood duck call, consider quality, ease of use, sound characteristics, durability, and price rather than focusing on one specification. Beginners may want to start with a reasonably priced model that is easy to learn, while experienced callers may have more specific preferences based on their calling style. Reading product descriptions and independent reviews can help, but personal preference still matters because two callers may prefer completely different sounds and levels of resistance. If you have the opportunity to hear a call before purchasing it, that can be particularly useful. The best call for one person may not be the best call for another, so think about how the call feels and sounds in your hands rather than assuming that a higher price automatically means better results.
Frequently Asked Questions About Wood Duck Calls
What is a wood duck call used for?
A wood duck call is designed to imitate or approximate wood duck vocalizations. Hunters may use calling as one component of their overall approach, but its effectiveness depends on factors such as bird behavior, environmental conditions, timing, and the caller’s technique.
What is the best wood duck call for beginners?
There is no single best call for every beginner. A good starting point is generally a call that is easy to operate, produces a consistent sound, and allows the user to develop control without requiring highly advanced technique.
How do I learn to use a wood duck call?
Start by learning basic airflow and producing a consistent tone. Practice regularly, listen carefully to wood duck vocalizations, and gradually work on changes in volume, pitch, and rhythm. An experienced caller can also provide useful feedback.
Are expensive wood duck calls better?
Not necessarily. Price can reflect materials, craftsmanship, design, and brand reputation, but an expensive call does not automatically make someone a better caller. Technique and familiarity with the call are extremely important.
How often should I practice wood duck calling?
Regular practice is generally more useful than occasional intensive sessions. Even brief sessions can help develop breath control, consistency, and familiarity with the call when practiced properly.
How should I maintain a wood duck call?
Follow the manufacturer’s care instructions, keep the call free of debris, manage moisture appropriately, and store it safely when not in use. The correct maintenance routine depends on the call’s design and materials.
Conclusion
A wood duck call is much more than a simple hunting accessory. Learning to use one effectively requires an understanding of the equipment, careful breath control, listening skills, regular practice, and the ability to adjust your approach according to the situation. Beginners can improve considerably by concentrating on producing clean and consistent sounds rather than trying to master complicated techniques immediately. Choosing a call that fits your experience level and learning how that particular call responds to airflow can provide a strong foundation for improvement. With patience and regular practice, hunters can become more comfortable with their equipment and better understand when and how calling fits into their overall wood duck hunting strategy. As with any hunting equipment, always follow applicable laws, regulations, seasons, and ethical hunting practices in your area


 Tech3 months ago
EO PIS: Complete Guide to the Electronic Office Personnel Information System in 2026
- Sports3 months ago
Mark Hines: The Multifaceted Journey of a Scientist, Athlete, and Thought Leader
- Fashion3 months ago
Jo Wilder: Exploring the Name, Authors, and Educational Impact
- Tech3 months ago
The Complete Supanet Mail Guide: Setup, Troubleshooting & Expert Tips for 2026
- Uncategorized3 months ago
Nerwey: Unlocking the Power of a Unique Digital Identity for Branding and SEO Success
- Tech3 months ago
The Definitive Article on xgrace19x
- Lifestyle3 months ago
Mercedes Spall: The Untold Story of Timothy Spall’s Daughter Who Chose Privacy Over Fame
- Fashion3 months ago
Deanna Che: The Enigmatic Landscape Architect and the Quiet Force Behind a Star’s Multicultural Roots